Introduction
This documentation will help you build a solid foundation for a drone network, enabling you to implement various swarm control algorithms specific to drones. This guide will cover wireless control of drones and manipulation of low-level network bindings.
For testing and demonstration, I will be using a FC (flight controller) supported by Cleanflight configurator, which simplifies the control part. The idea is to first set up a standard drone in a flight-ready state and then gradually introduce custom code. For example, there’s a detailed tutorial on how to fly a drone using an Android app.
If you missed the link above, I can provide you with some details here. The controller used is SPRACINGF3EVO, and it’s important to note that we’ll be focusing on brushed motor controllers rather than brushless motors. Brushless motors require ESCs (Electronic Speed Controllers) and larger batteries for safety and stability, whereas brushed controllers are simpler. However, the methodologies discussed in this documentation apply to both brushed and brushless controllers.
Once you have the FC board in hand, you’ll need to flash it with a program capable of handling control signals for motor driving and various sensor values like accelerometer and gyro. If you lack prior knowledge in flight control algorithms and ARM M series MCUs, Cleanflight offers a straightforward solution to get your drone airborne with just a few clicks.
Details regarding the WiFi module will be covered in upcoming posts. Once we have set up the WiFi, we can control the drone using any device capable of sending signals over WiFi, whether it’s an Android phone or a PC.
Hardware Specification
- FC (flight controller) - SPRACINGF3EVO
- WiFi module - ESP8285 or ESP8266
- Barometer - BMP280
- Magnetometer - QMC5883L
Methodology
Drone Control firmware
The drone will be flashed with Cleanflight firmware, which includes added support for barometer (BMP280) and magnetometer (QMC5883L). The firmware flashing process can be done using the Cleanflight configurator Chrome extension. The installation process for everything related to the project will be discussed in detail in a separate post.
Sensors
Since the drone (SPRACINGF3EVO brushed) doesn’t have onboard support for barometer and magnetometer by default, additional support for barometer (BMP280) and magnetometer (QMC5883L) needs to be added to enable assisted control over altitude and position.
Network
The goal is to control multiple drones over a wireless network (WiFi). To provide wireless network support to the drones and enable communication with the Ground Control Station (GCS), we will connect an ESP8285 WiFi module with custom firmware to each drone. Each module will receive commands or requests, which will then be communicated to the drone over MSP (MultiWii Serial Protocol). The packets received will be encoded according to the MSP Protocol, so each WiFi module will read and write these packets serially to the drone.
Formation control
To control the position and altitude of each drone, we need to distinguish each drone individually and track its object and IP address to ensure the correct control commands are sent to each drone.
Each drone will be made distinctive with a different color, and for object tracking, OpenCV will be used where each color will be mapped to the corresponding IP address of the drone.
Installation
Hardware
WiFi Module - ESP8285
Flashing Circuit for ESP8285
For flashing firmware into ESP8285, FTDI(USB -> Serial) chip is preferred, but you can also use Arduino Uno or Mega as a programmer. Connections for FTDI with ESP8285 are as follows:
| FTDI | ESP8285 |
|---|---|
| VCC (3.3v) | EN, VCC |
| TX3 | RX |
| RX3 | TX |
| GND | GND, GPIO |
Basically, grounding GPIO will take ESP8285 into the boot mode in which you can flash programs, applicable for all ESP modules.
Connection to FC
WiFi module will communicate with the drone on UART3. Hence, solder RX, TX, VCC (3.3V), and GND. The corresponding port will be enabled in the Cleanflight configurator.
| FC | ESP8285 |
|---|---|
| VCC (3.3v) | EN, VCC |
| TX3 | RX |
| RX3 | TX |
| GND | GND |
Barometer - BMP280 and Magnetometer - QMC5883L
BMP280 and QMC5883L will communicate with FC over an I2C bus (I2C2), whose pins are mapped over UART1 (PA9: SCL; PA10: SDA). The corresponding changes would be made in firmware. The connections are as follows:
| FC | BMP280 | QMC5883L |
|---|---|---|
| VCC (3.3v) | VCC | VCC |
| SCL2 (TX1) | SCL | SCL |
| SDA2 (RX1) | SDA | SDA |
| GND | GND | GND |
Software
Flashing Cleanflight Firmware
Cleanflight firmware is easy to get started with if you don’t want to write control algorithms and HAL drivers for the board all by yourself. To flash Cleanflight firmware, you need to install Cleanflight configurator chrome extension.
Make sure you have STM32 Virtual COM Port Drivers installed. These drivers will help you detect and flash programs into the controller.
Note: Debian or Linux users have to execute the following additional commands for flashing the firmware:
$ sudo systemctl stop ModemManager.service
$ echo 'SUBSYSTEM=="usb", ATTRS{idVendor}=="0483", ATTRS{idProduct}=="df11", MODE="0664", GROUP="plugdev"' | sudo tee /etc/udev/rules.d/45-stdfu-permissions.rules > /dev/null
Once you are done, you can connect FC via USB and open the Cleanflight configurator and follow the below mentioned steps:
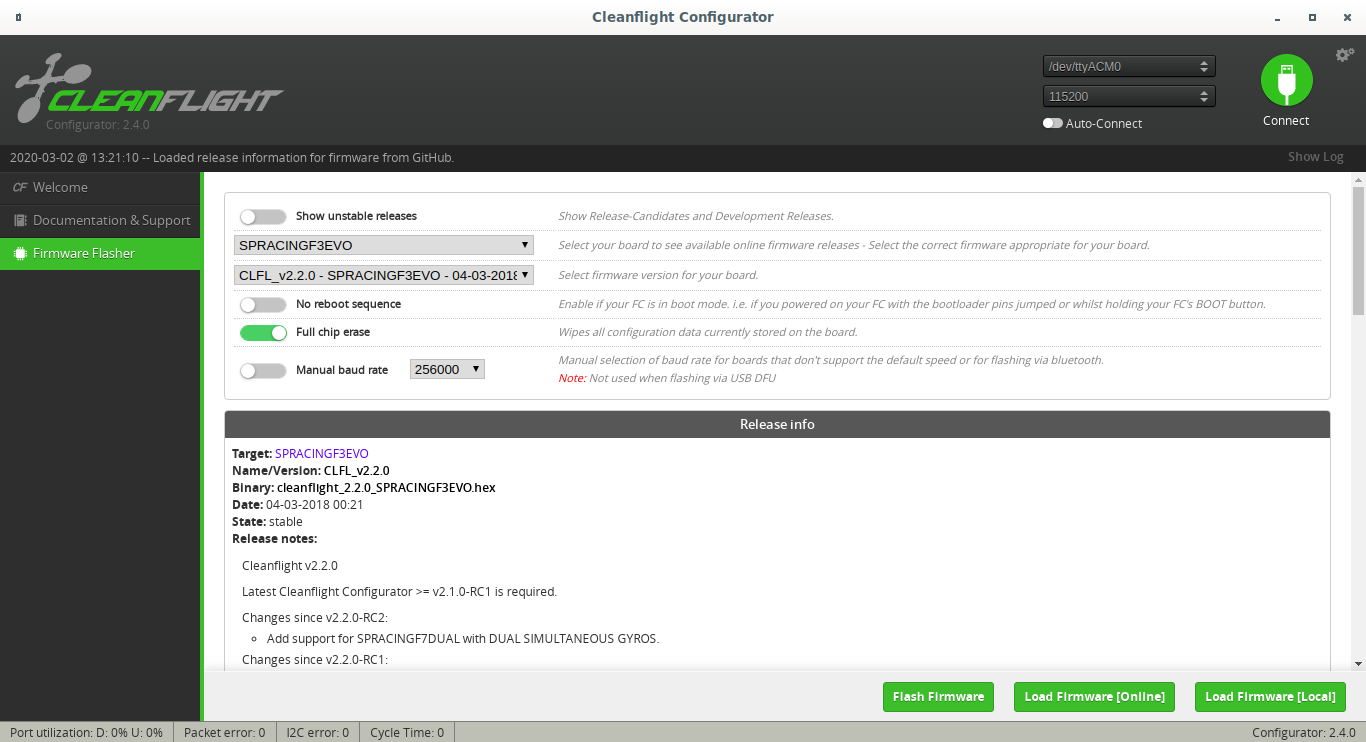
- Choose Board as SPRACINGF3EVO
- Choose Firmware version for SPRACINGF3EVO as CLFL_v2.2.0
- Enable Full chip erase
- Click on Load Firmware(Online)
- Click on Flash Firmware after it gets loaded
This project is very specific about the version because other versions might or might not have some functionalities also some additional support will be added in this firmware version in later phase. Other versions might not support MSP, altitude hold, etc.
Once you are done with flashing the firmware into the FC, you can set modes and toggle a few settings to enable MSP over one of the serial ports (UART).
Installing MultiWii Python Library
To install MultiWii python Library, follow the below given steps:
$ git clone https://github.com/krish-iyer/hackdrones
$ cd hackdrones/src/GCS/
$ pip3 install .
Flashing firmware to ESP8285 using Arduino IDE
Before proceeding, you need to add board support package for ESP8285 as follows:
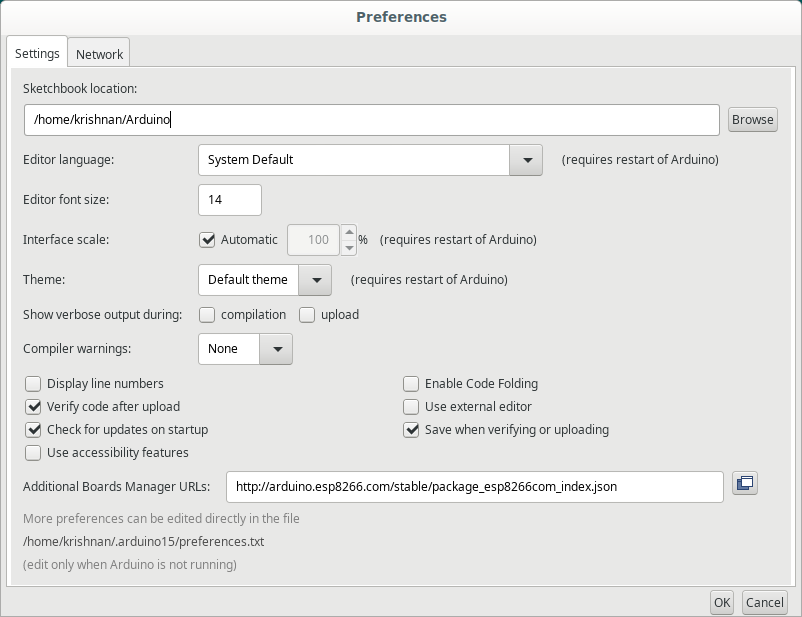
- Add http://arduino.esp8266.com/stable/package_esp8266com_index.json in File > Preferences
- Now go to Tools > Board > Board Manager
- Install ESP8266 package
- After connecting FDTI module with ESP8285, select board as Generic ESP8285 Module
- Select port (e.g., /tty/USB0)
- then click on Upload program